Friday, December 31, 2010

Happy New Year!

Happy New Year!  We are still in beautiful, snowy Sunriver as my cousin and her new husband are house-sitting up in Portland.  Some of our friends are coming down today and Ben's cousin came down yesterday.  We are going to have a fun filled night with a yummy halibut dinner and lots of champagne!  I'm going to have to find projects to do with champagne corks!  Haha.

As I reminisce over 2010, I completed many of the projects I wanted to do.  There is still a list of things I want to try out for next year.  Without further ado, here is my to-do list for 2011:
Find these adorable letterpress To Do Lists on Etsy
  • Wooden frame.  While searching for owl decorations for Audrey's birthday, I came across this frame at the Powell's Books for Home and Garden store on SE Hawthorne.  I thought it was so cute and would be fairly easy to make.  I would collect twigs from our yard (we have TONS of huge trees that dump sticks and twigs during the windy east county storms).  Ben could use his circular saw to cut them into 1 inch or less pieces, and then I would hot glue then to a frame (preferably one found on clearance at Michael's or Target).  I would give it a light sand and could even brush on a coat of polyurethane or just keep it bare.  I thought this idea would be cute with corks, too.  My friend Bailey made a huge cork board with the ends of corks and it turned out so cool.  I'll have to get a picture of it from her.
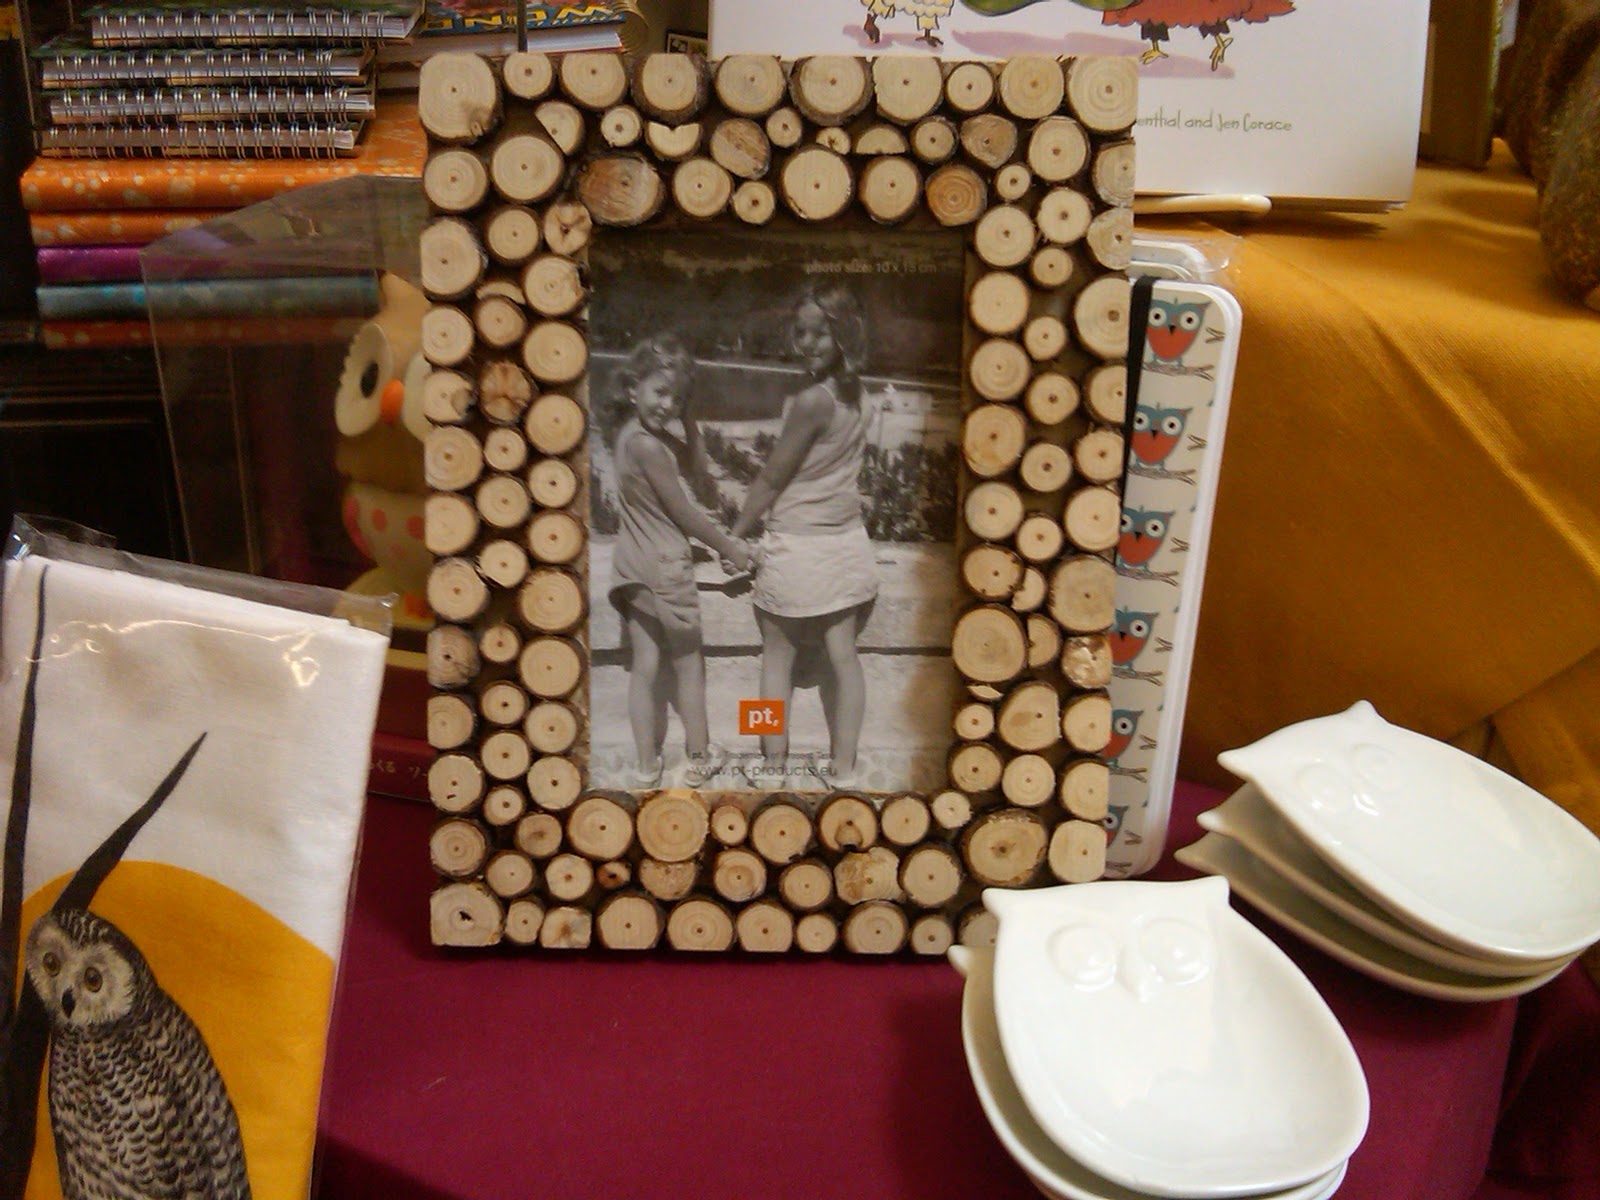
Notice the cute owl accessories around the frame!
  • While on a mission to find owl ornaments for Audrey's birthday (I know, I'm obsessed) I ventured over to Anthropologie and saw this cool circle garland.  It was made out of light blue paper, music sheets, and was sewed together with white thread.  I thought about making one for Audrey's birthday, using this tutorial from The Pleated Poppy, but I just didn't have time.  I do have a 2 3/4" circle punch and a 1" circle punch, which would make this project really easy.  I might just do it for Nathan's 5th birthday in February.  

  • Tile Coasters.  I wanted to make these from All Things Heart and Home using cheap ceramic tiles from Georgie's Clay and Ceramics, where I took some free teacher classes and made these little leaf beads, and also the left-over mosaic glass tiles from our bathroom remodel.  I would just need to buy a little grout, but I think this would be a cool, easy project and would make an awesome gift for someone.
  • Fingerprint Art.  This next project I thought would be really cute for Nathan to make for his grandparents.  It came from Tutus and Turtles.  I would choose paint colors to match each grandparent's decor, so it wouldn't be too out of place in their homes.  I love how the child who made these signed his name on the bottom, like real art!  Art canvases are on sale at JoAnn's right now, so I may have to go stock up to get ready for Christmas next year!
  • Mod Podge Hand Trees.  This project is sooooo cool and I can't wait to try it.  At Second Street came up with this awesome project because she was sick of ugly kid art.  I would gladly hang this at my house!  Again, I might be heading over to JoAnn's for those 50% off canvases! 
  • Last but not least, Rice Therapy Bags, from Sew, Mama, Sew!  I thought these would make nice gifts for pregnant friends or even good prizes for baby shower or bridal shower games.  You could make them in a variety of colors and scents.  I know I am hosting a bridal shower and two baby showers this spring, so I may have to whip some of these up!
So that's it.  My not too long To-Do list for 2011.  I'm sure I will find some more awesome projects and even make up a couple of my own as the year goes on.  Keep reading to see what I try and how it all turns out.  And if you leave a nice comment, I might just make one for you! :)

Thursday, December 30, 2010

More handmade Christmas gifts!

Here are two more gifts I did this Christmas: a Wine Cork Trivet and a Re-usable Shopping Tote.
I had been wanting to make a wine trivet for quite some time - see the post from last spring about all things wine!  For this trivet, I started with a wooden tile frame that I bought at Georgie's Clay and Ceramics, a shop in Portland that I went to some free teacher clay classes.  Anywho, I saw these frames on sale for $6.99 each and thought they would be great for wine corks, too.  Good thing I have been drinking lots of wine collecting lots of corks! ;)
I had Ben measure and cut a thin piece of plywood for each frame as I grabbed my glue gun and a vase full of corks from my fireplace mantle.

I hot glued the plywood inside the trivet, so it sits on the lip.  I then arranged the corks how I wanted them, and started gluing.  I did have to cut some of them shorter and cut a small piece off of one to fit in the middle.  See?
I made one for my friend Kara (the same friend who got the silhouette ornament) with all Oregon wine corks.  One for my cousin who lives in San Diego got all California corks.  Another one was for Ben's brother and his fiance with all Washington corks.  They live in Kirkland.  The one above is for my brother, and he got a combo of Oregon and California, since he has lived in both states.  Another friend saw Kara's and has already requested one for her birthday.  Looks like I'll be going back to Georgies for the trivets, since Amazon sells them for much more!

My other project was a re-usable shopping tote.  The pattern is actually from Ikea.  I found it in the fabric section.

The first step is to cut 2 pieces of fabric for the handles.  I used a pink and white striped fabric from the Home Decor department of The Fabric Depot in SE Portland (if you live in the area and haven't been there, you need to go!).  The handles need to be 28" long and 3.5" wide.

You iron a small hem on both sides, then fold it again.  I folded the fabric in half first so I would see the center line as I ironed the hem.
Pin the hems down and zig zag stitch down the middle to secure.  I used white thread.
Next, you need to cut the fabric for the bag.  The dimensions are 18" x 36".
Iron down both sides,
 Then fold and iron again to make the hem.  Pin and straight stitch close to the left edge.
Attach the handles 2.5 or 3" from the edges.  Pin and make sure that both handles are placed in the same place.  To sew the handles to the bag, I sewed a box then an x in the middle to make the handles more secure.  Sometimes I stuff my shopping bags really full because I am lazy and don't want to carry too many bags out to the car.  I definitely don't want the handles to fall off!
 Then sew the sides of the bag closed, inside out.
 Turn it right side out, and top-stitch the sides again.  I had cut the raw edges close to the stitch before I flipped it right side out.  That way when I top-stitched, you wouldn't see the raw edges sticking out.
Here is the completed bag!  I gave it to my mom, and she loved it!
 I really like the idea of making these.  It doesn't take too much fabric and people can always use them.  You could make them out of nylon and make little bags to stuff them into.  Or, sew little straps on the bottom with snaps, like this one from Bath and Body Works, then you can roll it up and secure with the snaps.  I made one for my friend Pat when she was subbing this fall out of this fabric from Ikea in gray.  I stuffed it full of subbing supplies, such as a planner, stickers, colorful pens, thank you cards to leave for teachers, even a coffee thermos.  She loved it and uses it all the time!  I really want to try this pattern next, from Sew, Mama, Sew!  It is a bigger bag with a pocket on the outside.

So that's it.  Those are all the gifts I made this year.  With Audrey's birthday party, my birthday, tons of events with my class, finishing up my last class for my Reading Endorsement, Christmas, and New Years, I think I did pretty well with making some thoughtful, quality gifts for friends and family.  Did you make any gifts this year?  Tell me all about them!

Monday, December 27, 2010

Handmade Christmas Gifts, part 3

Coffee Cozies!!


I was inspired by Robin over at All Things Heart and Home.  Make sure to check out her tutorial, since I didn't take the best pictures of this project.

I downloaded Robin's pattern and cut out 2 pieces of coordinating fabric and a piece of fusible batting.  I pinned them together right side in and sewed along the edge, leaving a 3 inch hole to turn it right side out, and also sewing in a half of a hair tie into one of the sides (seriously, look at Robin's directions, it will make more sense!)


Once it was all turned right side out, I ironed it, activating the fusible batting, so the fabric will stick together.

Then I top stitched around.  On this one, I tried out one of the fancy decorative stitches on my fancy new sewing machine.  This stitch is a simple flower.

I used a cardboard Starbucks coffee sleeve as a guide to know where to put the button.  I hand stitched on the button and slipped the hair tie around it to clasp.

I think it turned out pretty cute!

This project was really easy.  I made three of them in a couple hours for my work friends in our "coffee club" -we take turns each Friday buying a coffee for each of us, then sit around and chat before school while drinking our coffees.  It's super fun.

I will definitely be making more of these, they would make a fun addition to a tea or coffee themed gift basket or throw one in with a personalized coffee thermos for a really special gift.  Now I just need to make one for myself!

Handmade Christmas Gifts, part 2

Here's my next hand made Christmas gift: cloth napkins!

The idea came from one of my fav craft/DIY blogs, Our Humble A{Bowe}d.  I got an amazing new sewing machine for my birthday from my mother in law, so I really needed to start a new sewing project.

Amanda gives great directions in her tutorial.  This is what I did:

I started out with one yard of this calico fabric from Joann's, on sale for $4.99/yard.  I cut it into four 18 inch squares on my rotary mat.

 I then ironed a small hem all the way around.

I ironed a second hem to conceal the rough edges and pinned it in place.

Using white thread, I straight stitched all the way around, keeping the stitches close to the edge of the hem.  When I got to the corners, I stitched to the end, then reversed back to the edge of the hem, put down the needle, raised the presser foot, and rotated the fabric 90 degrees.  I found that by stitching to the end and reversing kept the corners all laying flat and made me feel better about them not unraveling after multiple washes.

Here is the set of four napkins all completed.

For one set of napkins, I made fancy napkin rings as well.  I made the leaves at school using left over clay from my class' snowflake clay ornament project that we did for Christmas gifts.  I bisque fired the little leaves in the kiln at school, glazed them green, and fired them again.  I had poked a small hole in the top of each one before bisque firing them.  I had originally thought about making beaded bookmarks out of them.    I can still do that, as I have 3 left after making the napkin rings.  We'll see if I have time! :)

I used wire rings that are intended for wine charms.  I wound wire through the hole in the leaves, so they would hang correctly and used glass beads and pearly beads to decorate the charms.  I'm really happy with how they turned out and now can't wait to go back to school next week to try to make more clay beads out of my left-over clay scraps that would usually just be thrown away!

This whole project, with the napkins and rings, only cost me the $4.99 for the yard of fabric.  Everything else I already owned.  Ironing down the hems was time consuming and so was sewing around all four napkins, so this isn't a quick project, but it was fairly easy and really useful.  I will definitely be making these again!

Saturday, December 25, 2010

Handmade Christmas Gifts, part 1

I mentioned earlier that I was going to hand make a lot of my Christmas gifts this year.  As people open their gifts, I'll post them here.

The first one was for my friend Kara.  It's an ornament with a silhouette of her dog, Chip.
I got the idea from blog posts from Our Humble A{Bowe}d and Young House Love.

I started out with a foam paint brush,
 silver acrylic paint,
a paper mache flat circle ornament,
 a bottle of glossy Mod Podge,
 a piece of black scrapbooking paper,

and a profile view of Chip.
I first painted the front and back of the ornament silver.  I put two coats on each side.  As the paint dried, I worked on the picture.  I printed out Chip's picture on my printer in a 3x5 size, cut out around his face, and traced it onto the black paper.  I cut out the face from the black paper and glued it onto the dry ornament with some Aileen's Tacky Glue.  Using a clean sponge brush, I brushed on two thin coats of Mod Podge, letting it dry between each layer.

Kara loved having a cute, modern ornament of her beloved dog.  Here it is again.

I can't wait to make more of these for friends and family.  I can use silhouettes of kids, dogs, cats, even a first home.  The possibilities are endless!

Merry Christmas!

Wednesday, December 22, 2010

Audrey's Birthday Bash!!

Audrey's first birthday party was last Saturday and I did a few DIY projects to get ready for it.

First, I made a paper banner that I hung across the mirror in our dining room that says "Audrey".
I used my paper punches to create this out of white, pink, and green card stock and a sheet of white scrapbook paper with multicolored polka dots.  I have a 1 in circle punch, 2 in scallop punch, and a 2 3/4 in circle punch, all by EK Success.
I got the little owl from a collage sheet of 1 in round owl graphics from Nice Designs on Etsy.  It cost $4 and she emailed it to me that day!  They are printed out on white card stock.
I used some scrap-booking paper I already had for the letters.  I traced a set of letter stencils I had at school and cut them out on the pretty paper.  I then took an exacto knife to make slits at the top and threaded the ribbon through. 

Another thing I made were the party favors for all of Audrey's little friends.  I made personalized bags that I put a sheet of owl stickers in and a handmade owl onesie (or shirt for the big kids).
The bags had a green circle for boys and a pink one for girls.  Then they had a scallop polka dot with owl in the middle and I hand wrote their names on the circle.  I then glued it on a white paper bag that I got in a set of 6 at JoAnns.
 The onesies where fun to make.  I asked each mom which size their kiddo wears.  I then picked out the pink, green, and brown polka dot fabric for the girls and a green polka dot fabric for the boys. 

This was my inspiration for the onesies.  This one is from Presents of Mind, a cute little shop on SE Hawthorne in Portland.  It was $20, so i knew I could make it for cheaper.  I got Carter's and Gerber onesies on sale at Babies R Us and the fabric on sale at The Fabric Depot (a HUGE fabric store in SE Portland).  I traced the owl onto webbed interfacing and ironed it on the fabric, then cut out and ironed onto the onesie.  I zig-zag stitched around the owl, then straight stitched up and back for the wings.  My onesies didn't have the little feet (I thought they looked a little weird) and they also didn't have eyes (I tried one and it is REALLY hard to zig-zag in a small circle!)

Audrey had an owl onesie as well.  Her's was made out of cupcake fabric and had a pink felt number one stitched in the middle instead of wings.  I used a fancier onesie, the fabric had a little bit of texture to it and there was a bit of pink stitching along the neck line.  The birthday girl needed her shirt to be special!
 She also wore an adorable headband made by my friend Michelle Armstrong, a pettiskirt tutu made by Boutique Hermosa on Etsy, and adorable Robeez-esque owl shoes made by Wildcubs on Etsy.
 I just love this tutu.
The shoes are adorable.  Robeez doesn't make shoes with owls on them, so these were so perfect!

The last was the food.  Unfortunately I was so busy, I didn't snap any pictures of the food table.  I asked a few of my friends to bring an appetizer to share and luckily, no one brought the same thing!  The food was so good!  I made pink punch that was in a pretty punch bowl and put out cute plates, cups, and napkins that I got at Amazon.  I also put out some sippy cups, plastic bowls, and baby spoons for the babies in attendance.  I had baby snacks on the coffee table and applesauce on the food table.  The babies got to eat, too!  My mother in law made adorable and delicious pink cupcakes in silver cupcake liners.  I made paper owl cupcake toppers for all of them, kinda like this one.
Mine were the scallop punched polka dot paper with a 1 in owl circle glued in the middle, just like the banner and treat bags.  I glued them to a white lollipop stick and put them in each cupcake.  I arranged the cupcakes in my white cupcake stand.  I can't believe I didn't take a picture of them!  Here's a tutorial if you want to make some of your own.

I asked my mother in law to also make Audrey's cake.  My idea was for her to have a giant cupcake on her high chair.  My MIL thought that sounded crazy, but she obliged and borrowed a cupcake pan from a friend to make one.  It turned out soooooo adorable and Audrey loved it!

Happy Birthday to my sweet baby girl.  She makes me so happy and I can't imagine my life without her.  I hope all of our guests had a nice time at the party.  We wanted them to feel as special as we do to have Audrey in our lives!