Showing posts with label classroom. Show all posts

Sunday, September 11, 2011

Bucket Filling and a FREEBIE!

I first heard about Bucket Filling last year and loved the idea of it.  I knew it was something I'd like to do in my classroom, but I didn't want to start it at the end of the year.  So this year, I am going to slowly try to become a Bucket Filling teacher!

A Bucket Filler is someone who does and says nice things for other people, filling their invisible "buckets".  A bucket dipper is a bully or someone who does mean things to others.  It's such an easy concept for kids and I really like the idea of creating a classroom where the students are polite, respectful, and just plain nice people.  This book, Have You Filled a Bucket Today? by Carol McCloud illustrates it so well for kids.  I would say you could use this book with any elementary aged class. 

I started my lesson on Friday by reading the book to the kids and having them brainstorm some ways that they can fill someone's bucket.  I then handed out this sheet from Teacher Bits and Bobs.
The students wrote their idea for filling someone's bucket, illustrated it, and made a cute little bucket from construction paper.  On Monday, we are going to edit our sentence and add a background to the illustration.  We are also going to learn the Bucket Filler song I found on Mrs. Talbot's Golden Stars.  She has linked the song AND included a printout of the lyrics for kids to read along.

Most of these ideas I got from Pinterest, where I have a full board dedicated to Bucket Filler ideas.  I also stumbled across a Linky party at First Grade Brain with all ideas about Bucket Filling. 

My next steps are to create a bucket board for kids to have each of their own buckets.  I was inspired by these boards:
Via Yearn to Learn
Via Ms. Jones' Jungle
Via A Day in the Life of a Second Grade Teacher


Another thing I am thinking of is to create the buckets with cute buckets from Oriental Trading and attaching them to a framed bulletin board I have yet to hang in the room.  Most of my wall space is already taken up, so this could be a challenge.  When I finally figure it out, I will definitely show you what it looks like!

When I do eventually make my board, these are the notes my students will be writing to each other.  I can't wait!
Bucket Filling Sheet

Sunday, August 28, 2011

DIY Crayon Art

I had a couple more boxes of crayons and a billion ideas pinned on my Pinterest boards.  So of course I had to make something else today!!!


It all started with this inspiration:
Via Pinterest
A seller on Etsy makes these for $75 bucks a pop.  I knew I would be able to easily make one of my own.  I had a couple canvases in the basement that I had been saving to paint some art work for our bedroom.  I never got around to doing that and since we decided to sell the house later this year, I figured I could re-purpose the canvases.  We've lived this long without art in the bedroom.  What's a couple more months, right??

I googled "melted crayon art" and found this tutorial.  She also used the Etsy piece as an inspiration.  Great minds think alike!  She peeled all the wrappers off her crayons, though, which is a step I didn't do.  Mainly because peeling crayons sucks.  Once of the commenters on her blog, however, said that if you soak the crayons in water first, they peel off easier.  Great tip for when I make melted crayon shapes!
Via Unsimple Living
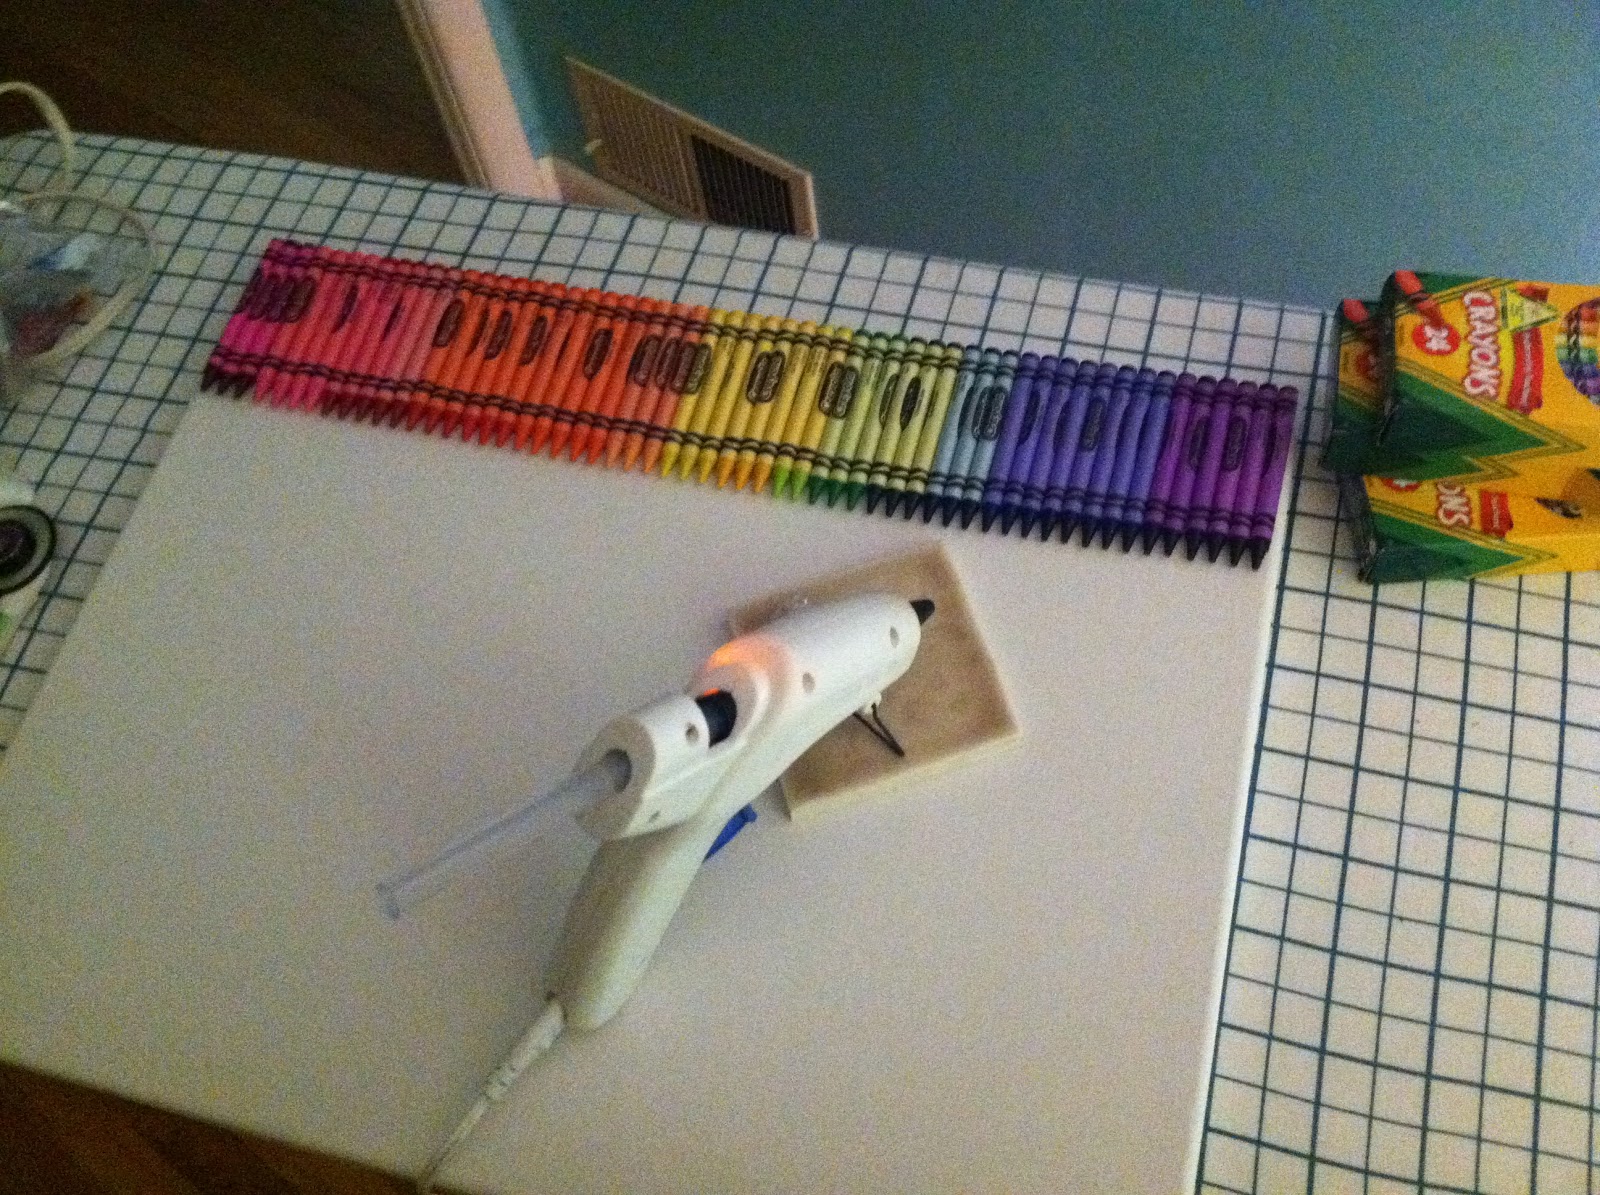
I got out the trusty glue gun and a couple more boxes of crayons that were left over from the crayon wreath project.  I lined the crayons up on the canvas in an order that I liked and started gluing away.  I omitted the gray, white, brown, and black crayons since I wanted it to be bright and colorful.
After they were all glued on, I let it dry over night.  I didn't want to risk having the hot glue heat up during the next process and have crayons falling off the canvas. 

The next morning I taped up an old piece of painter's plastic (we used it over Audrey's crib when we painted the ceiling in the kids room a couple of weeks ago) above the mirror and placed the canvas on top of it.  In the tutorial above, it looked like there was some splatter behind.  I definitely did not want melted crayons splattering on our gorgeous bathroom countertops!
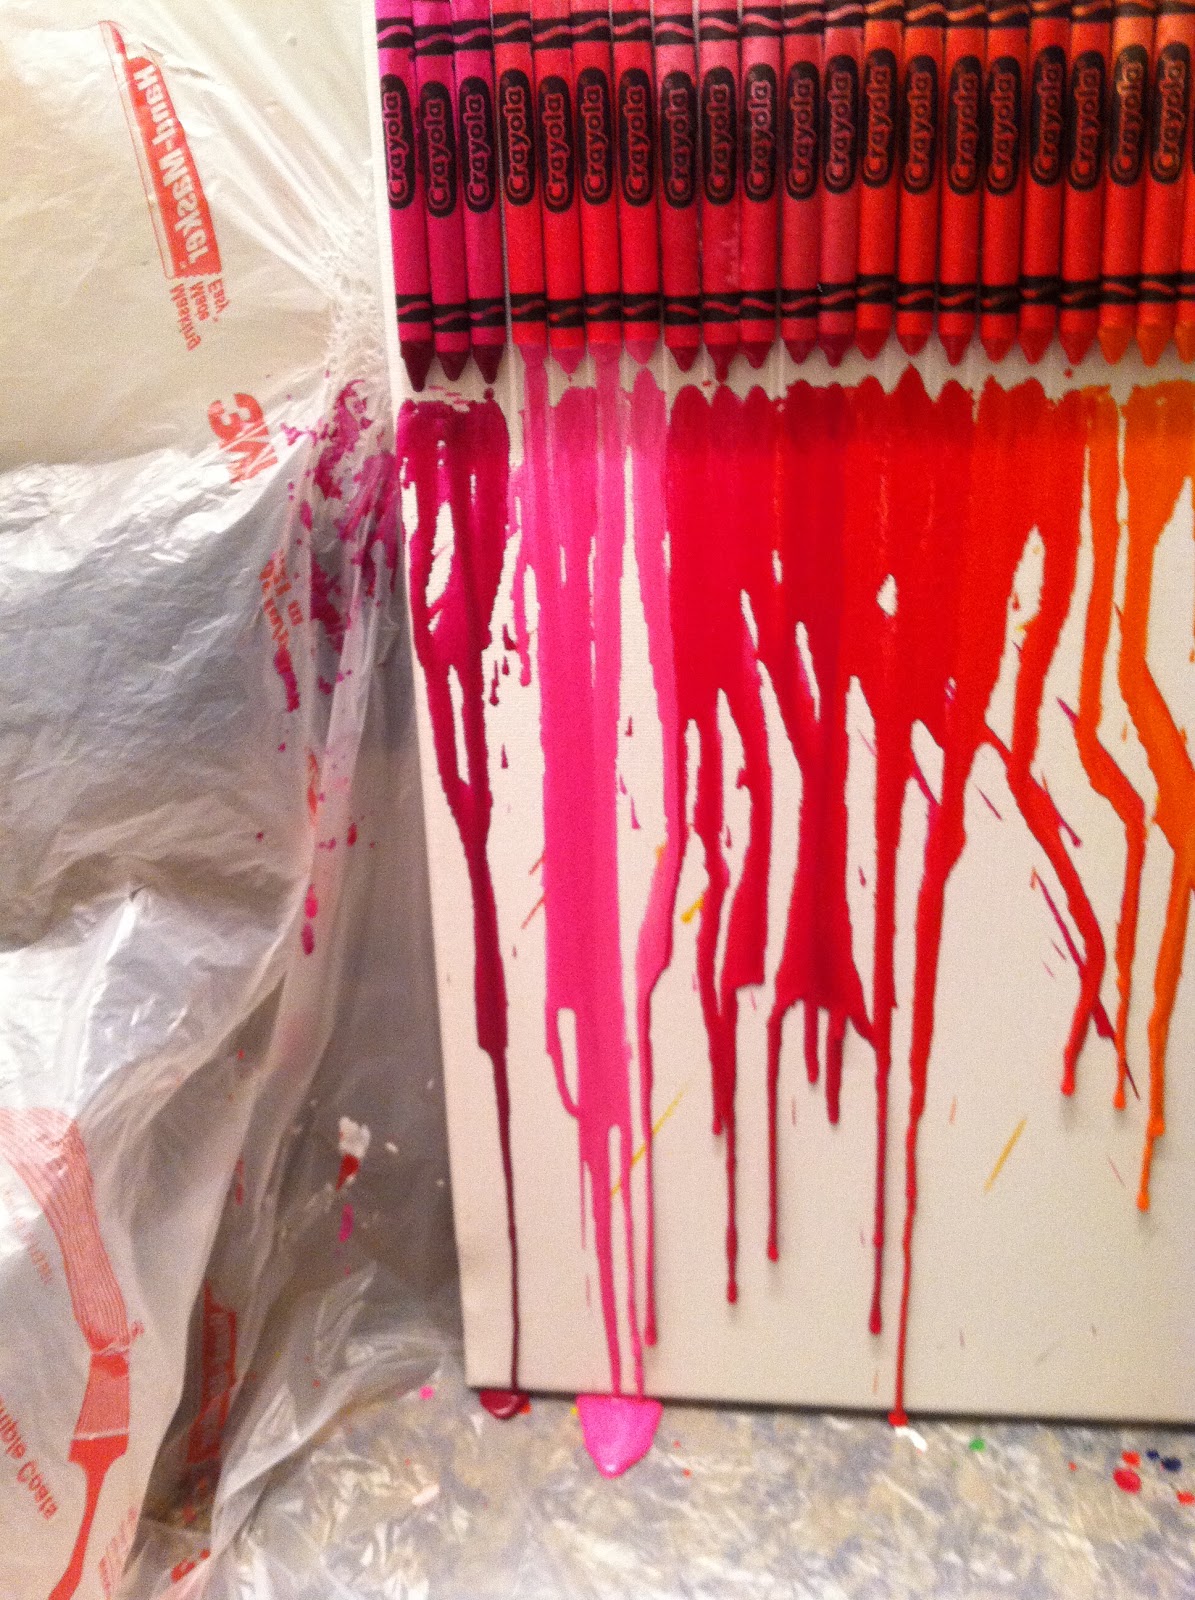
I then got out my hair dryer and blasted the crayons at full speed, to soften them up.  This worked well, but the force of the dryer caused a couple of colors to splatter across the canvas.  Ruh row.

The effect was working well, though.

Ben mentioned that he had a heat gun.  Would I like to try it?  Yes, please!  Enter Ace Hardware's heat gun:
I used the low setting, since this is significantly hotter than a hair dryer.  And I did not want splatters all over the canvas.  It worked much faster than my hair dryer.  I had to be careful of the plastic behind, though, since it liked to melt under the heat gun.  No melted plastic is allowed on our bathroom mirrors.  I guess that is an unwritten rule of the house.  :)

I love how the crayons melted all the way to the bottom, filling up the entire canvas.  The heat gun made it a quick project and I'm super happy with how it turned out.

I can't wait to show it to you in my completed classroom!  It will look so cute with all the other colorful elements I am adding. 

Cost Breakdown:
3 boxes of crayons ($0.40 a piece at Walmart) - $1.20
White Canvas (40% off at Michael's) - already owned
Hot glue - already owned
Hair dryer and Heat gun - already owned
Total cost - $1.20 - Smokin' deal!!
 
Do you have any Pinterest projects you are working on?  What about back to school?  I'd love to hear about them!  Maybe you have some other DIY art ideas that you've been dying to try.  Let me know!

Pinterest Craft - Crayon Wreath

Like I said in my previous post, I love Pinterest!  I get so many awesome ideas for my home and classroom.  It's great. 

For my latest Pinterest-obsession craft, I made a crayon wreath.  Here's how it turned out!


I started off with these projects as inspiration:
Via Pinterest
I really liked the ruler sign with the teacher's name.  I was afraid the lollipops would get gross after awhile, though.  And I didn't like that you could see the styrofoam wreath behind it.  

Via Moms Party Cafe
This one uses embroidery hoops instead of a wreath form.  I liked that you couldn't really see them from behind.  I also really liked the dressmaker's ruler as the ribbon, but could only find bright yellow at Michael's so I ended up getting regular ribbon instead.


Via The Ballard Bunch

 I loved the fabric flowers on this one.  I made some fabric flowers for my earring holder that I just finished, so I knew I'd be able to make these ones pretty easily.

Via Scrapping West
This one also uses embroidery hoops and has a good description of how it's done.


Armed with confidence from trusty, old Pinterest, I gather my supplies and got to work.
I actually started this project when we were in Sunriver a couple of weeks ago.  I love doing projects in Sunriver because I don't have to worry about weeding the front yard, finishing painting the ceilings, running errands.  I get to spend time with the family during the day and craft away after the kids go to bed.  I wish I could live there!

Anywho, I went to Michael's in Bend and got the glue gun, ribbon, and embroidery hoops.  I ended up leaving the glue gun at the house in Sunriver so it will be there for next time I decide to craft up a storm while on vacation!  I went school supply shopping for my classroom at Walmart and picked up a couple extra boxes of crayons and a wooden ruler.

I set the crayons on the embroidery hoops and decided how I wanted them arranged.  I ended up going in rainbow order twice.  After I was happy with the arrangement, I glued them all on with the hot glue.  I glued them on label side down, because I thought it could get too busy with all the labels facing up.  And then you can read the color names. 
I then made my fabric flowers, using this tutorial, and glued them on.  I laced the ribbon through the top, near the clasp that holds the embroidery hoops together, and glued the ruler on.  I'm not super happy with my handwriting on the ruler.  I might replace it with some sticker letters or enlist the help of an artsy friend.  Or I might just get lazy and leave it the way it is. 

I love it and can't wait to show you where it lands in my classroom after I'm all done setting it up!

Here's the breakdown of costs:
3 boxes of crayons ($0.40 each at Walmart) - $1.20
1 wooden ruler - $0.97
2 embroidery hoops ($2.50 each at Michael's Crafts) - $5.00
Ribbon, on sale at Michael's - $0.99
Fabric - already had
Total: $8.16


Do you know of any teachers who would love something like this?  What do you like to do to get ready for the beginning of school?


Wednesday, March 16, 2011

Keep Calm

Is it just me, or are the Keep Calm and Carry On signs everywhere?  For Valentine's day it was Keep Calm and Love On.  For Thanksgiving: Keep Calm and Gobble On.  And even for St. Patrick's Day I saw Keep Calm and Pinch On. 

Well, I'm not so into pinching, especially with 1st graders, so I decided to make one of my own: Keep Calm and Read On.  I actually saw it in a classroom my team was observing to learn more about Daily 5 and CAFE.  I thought it was adorable and would be easy to re-create.


I put it in a clear sheet protector and, using packing tape, taped it to the side of a bookshelf in my classroom library.  I love it and so do the kids!  I might print another one to display in our large Expedit shelf - It would look great in a white frame!

Make sure to leave a comment with your email address and I will email it to you.  If you'd like it in a different color, just let me know!

What other Keep Calm signs have you seen?

Edit: I just uploaded several new colors to my Scribd account and also pinned them on my Pinterest account.  Thanks!