Sunday, August 28, 2011

DIY Crayon Art

I had a couple more boxes of crayons and a billion ideas pinned on my Pinterest boards.  So of course I had to make something else today!!!


It all started with this inspiration:
Via Pinterest
A seller on Etsy makes these for $75 bucks a pop.  I knew I would be able to easily make one of my own.  I had a couple canvases in the basement that I had been saving to paint some art work for our bedroom.  I never got around to doing that and since we decided to sell the house later this year, I figured I could re-purpose the canvases.  We've lived this long without art in the bedroom.  What's a couple more months, right??

I googled "melted crayon art" and found this tutorial.  She also used the Etsy piece as an inspiration.  Great minds think alike!  She peeled all the wrappers off her crayons, though, which is a step I didn't do.  Mainly because peeling crayons sucks.  Once of the commenters on her blog, however, said that if you soak the crayons in water first, they peel off easier.  Great tip for when I make melted crayon shapes!
Via Unsimple Living
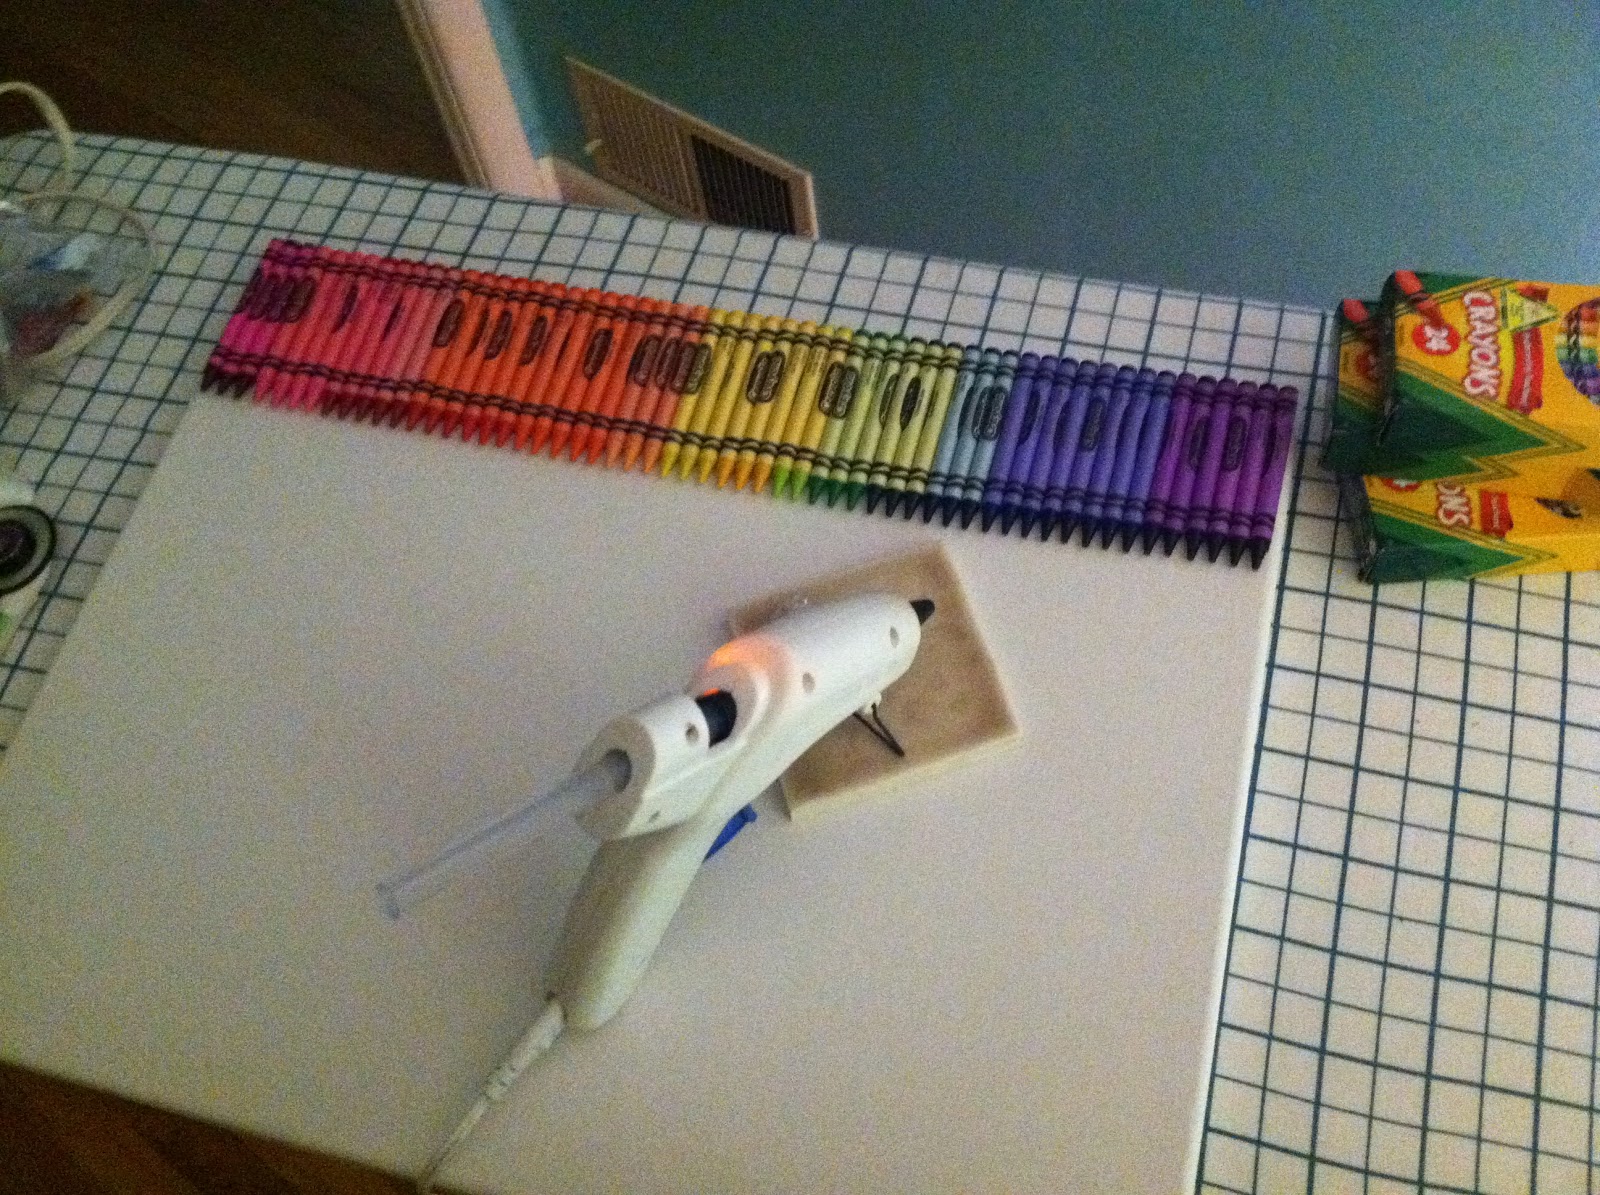
I got out the trusty glue gun and a couple more boxes of crayons that were left over from the crayon wreath project.  I lined the crayons up on the canvas in an order that I liked and started gluing away.  I omitted the gray, white, brown, and black crayons since I wanted it to be bright and colorful.
After they were all glued on, I let it dry over night.  I didn't want to risk having the hot glue heat up during the next process and have crayons falling off the canvas. 

The next morning I taped up an old piece of painter's plastic (we used it over Audrey's crib when we painted the ceiling in the kids room a couple of weeks ago) above the mirror and placed the canvas on top of it.  In the tutorial above, it looked like there was some splatter behind.  I definitely did not want melted crayons splattering on our gorgeous bathroom countertops!
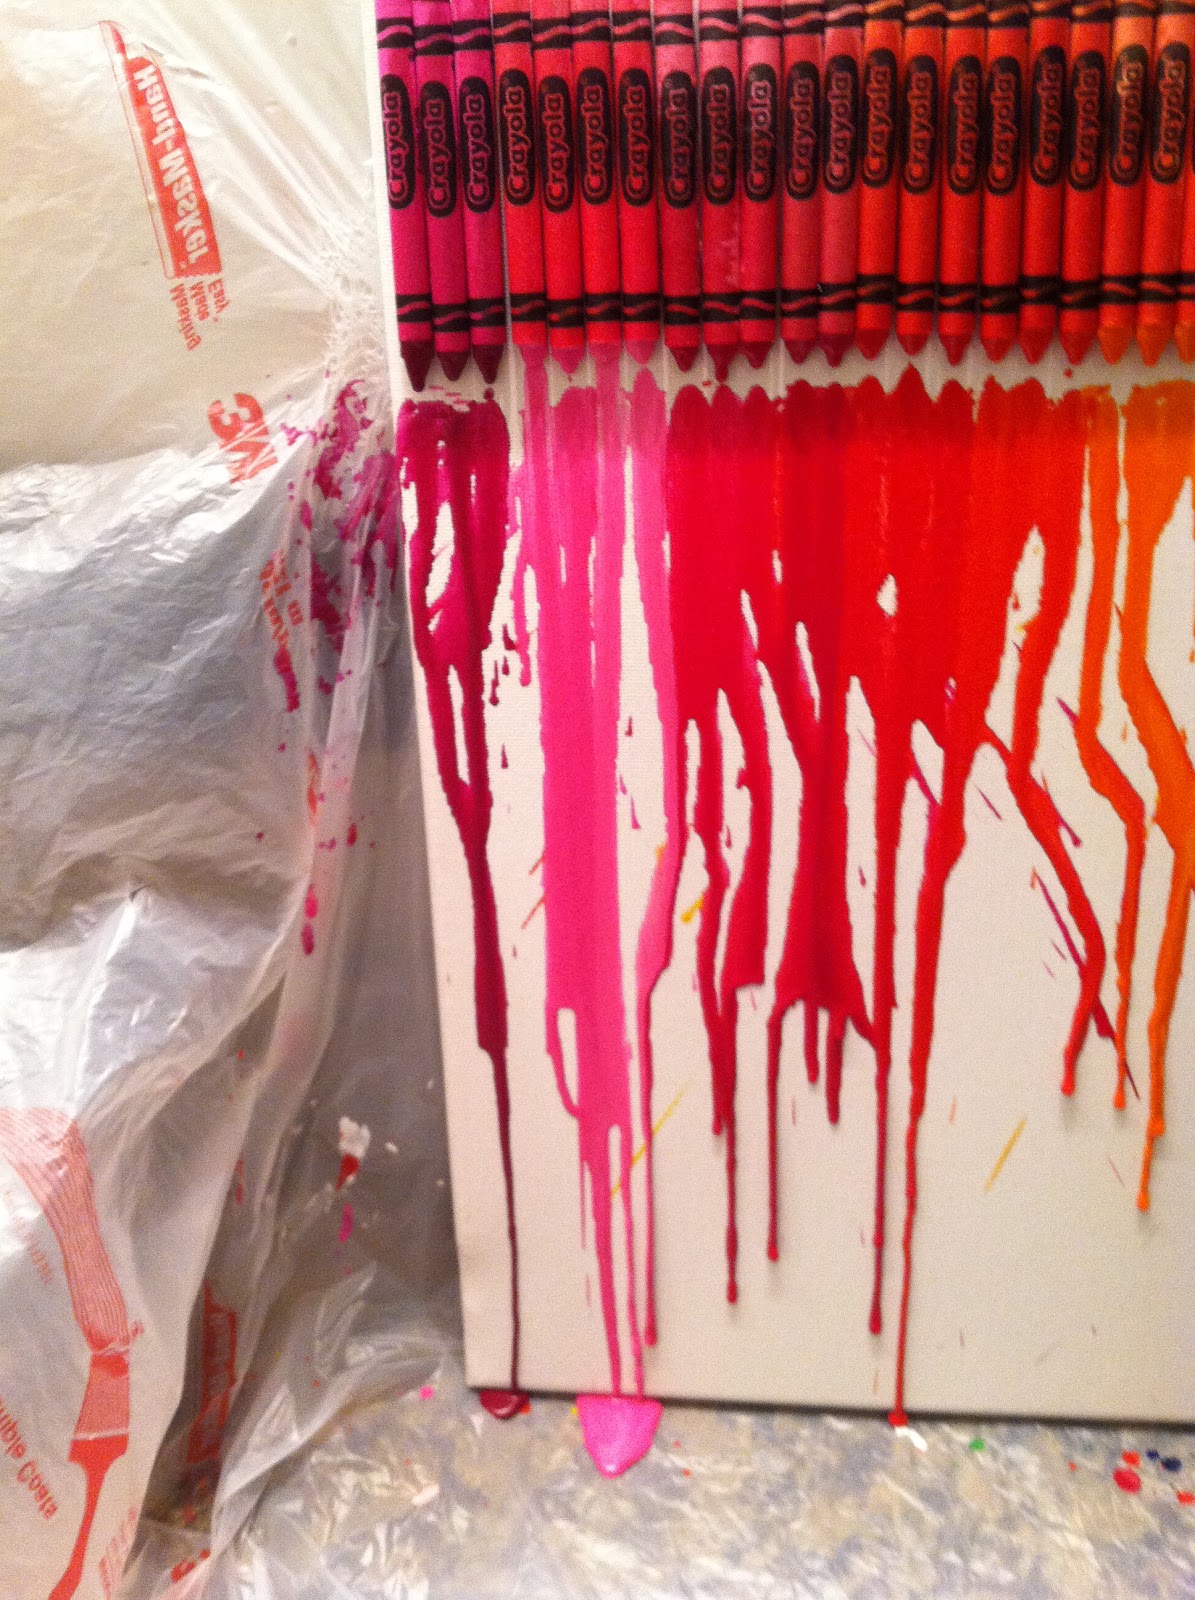
I then got out my hair dryer and blasted the crayons at full speed, to soften them up.  This worked well, but the force of the dryer caused a couple of colors to splatter across the canvas.  Ruh row.

The effect was working well, though.

Ben mentioned that he had a heat gun.  Would I like to try it?  Yes, please!  Enter Ace Hardware's heat gun:
I used the low setting, since this is significantly hotter than a hair dryer.  And I did not want splatters all over the canvas.  It worked much faster than my hair dryer.  I had to be careful of the plastic behind, though, since it liked to melt under the heat gun.  No melted plastic is allowed on our bathroom mirrors.  I guess that is an unwritten rule of the house.  :)

I love how the crayons melted all the way to the bottom, filling up the entire canvas.  The heat gun made it a quick project and I'm super happy with how it turned out.

I can't wait to show it to you in my completed classroom!  It will look so cute with all the other colorful elements I am adding. 

Cost Breakdown:
3 boxes of crayons ($0.40 a piece at Walmart) - $1.20
White Canvas (40% off at Michael's) - already owned
Hot glue - already owned
Hair dryer and Heat gun - already owned
Total cost - $1.20 - Smokin' deal!!
 
Do you have any Pinterest projects you are working on?  What about back to school?  I'd love to hear about them!  Maybe you have some other DIY art ideas that you've been dying to try.  Let me know!

Pinterest Craft - Crayon Wreath

Like I said in my previous post, I love Pinterest!  I get so many awesome ideas for my home and classroom.  It's great. 

For my latest Pinterest-obsession craft, I made a crayon wreath.  Here's how it turned out!


I started off with these projects as inspiration:
Via Pinterest
I really liked the ruler sign with the teacher's name.  I was afraid the lollipops would get gross after awhile, though.  And I didn't like that you could see the styrofoam wreath behind it.  

Via Moms Party Cafe
This one uses embroidery hoops instead of a wreath form.  I liked that you couldn't really see them from behind.  I also really liked the dressmaker's ruler as the ribbon, but could only find bright yellow at Michael's so I ended up getting regular ribbon instead.


Via The Ballard Bunch

 I loved the fabric flowers on this one.  I made some fabric flowers for my earring holder that I just finished, so I knew I'd be able to make these ones pretty easily.

Via Scrapping West
This one also uses embroidery hoops and has a good description of how it's done.


Armed with confidence from trusty, old Pinterest, I gather my supplies and got to work.
I actually started this project when we were in Sunriver a couple of weeks ago.  I love doing projects in Sunriver because I don't have to worry about weeding the front yard, finishing painting the ceilings, running errands.  I get to spend time with the family during the day and craft away after the kids go to bed.  I wish I could live there!

Anywho, I went to Michael's in Bend and got the glue gun, ribbon, and embroidery hoops.  I ended up leaving the glue gun at the house in Sunriver so it will be there for next time I decide to craft up a storm while on vacation!  I went school supply shopping for my classroom at Walmart and picked up a couple extra boxes of crayons and a wooden ruler.

I set the crayons on the embroidery hoops and decided how I wanted them arranged.  I ended up going in rainbow order twice.  After I was happy with the arrangement, I glued them all on with the hot glue.  I glued them on label side down, because I thought it could get too busy with all the labels facing up.  And then you can read the color names. 
I then made my fabric flowers, using this tutorial, and glued them on.  I laced the ribbon through the top, near the clasp that holds the embroidery hoops together, and glued the ruler on.  I'm not super happy with my handwriting on the ruler.  I might replace it with some sticker letters or enlist the help of an artsy friend.  Or I might just get lazy and leave it the way it is. 

I love it and can't wait to show you where it lands in my classroom after I'm all done setting it up!

Here's the breakdown of costs:
3 boxes of crayons ($0.40 each at Walmart) - $1.20
1 wooden ruler - $0.97
2 embroidery hoops ($2.50 each at Michael's Crafts) - $5.00
Ribbon, on sale at Michael's - $0.99
Fabric - already had
Total: $8.16


Do you know of any teachers who would love something like this?  What do you like to do to get ready for the beginning of school?


Monday, August 22, 2011

Earring Holder

While perusing Pinterest, I've noticed so many adorable earring holders lately.  I decided to make myself one! 

Here's one I loved, originally from I Heart Organizing:
And another one from A Girl and a Glue Gun:

I really liked the use of radiator screens from the top one and the fabric rosettes from the second one.  I decided to use a silver frame Ben's dad had given us that was sitting unused in our basement.  I then went to Home Depot and got a decorative radiator grate.  I had a guy at the store cut it into the dimensions I needed for my frame.  There was enough for him to cut two pieces.  I plan to use the second piece to make an earring holder for a friend as a gift.
I spray painted it white, since I thought this color would look ugly with my silver frame.  We already had a can of spray paint in the garage left over from painting little bird houses for my friend Carla's baby shower.  All I did was spray the grate white and pop it in the frame.

I then got to work making the fabric rosettes.  Here are my supplies:
I started off with this tutorial from Little Birdie Secrets.  She has you use fabric glue and 1 inch wide strips of fabric.  She suggested ripping the fabric to create long pieces of threads coming off the fabric.  I tried that, but it didn't rip very well.  I ended up washing and drying my strips, then ironing them flat.  This made it look a little more rugged.  As per the tutorial, you tie a knot in the end of a strip of fabric, and twist and wind around itself to create the flower, gluing every few centimeters as you go.  I made two flowers with this technique, one a little bigger than the other.

I then switched over to a tutorial from Lillyella: Uniquely You.  In the directions, you wrap your fabric strip around a skinny piece of cardboard.  I used the side of an empty spaghetti box - work with what you got!  You then iron the fabric to get creases in it.  Then, you remove the cardboard and wrap the fabric around a pencil.  When you remove the pencil, you can form it into a rosette.  Go to the original blog for better pictures and directions.  Lillyella does a much better job at explaining this than I do!

The next step was hot gluing the rosettes to my frame, adding earrings, and hanging it in my bathroom! 
 I love how it turned out!  I layered the last rosette on top of the first two, since it was poufier (is that a word??) 

 Here is a close up of the flowers.  You can see the raw edges of the fabric, which I like.  It would be cute to add a little pearl bead in the middle of the biggest rosette, too.  I think I'll stop here, though.


Here is a close up of another corner, so you can see the pattern of the metal sheet and the thin frame I used. 

Here is a breakdown of cost:
Frame - free
Metal sheet - $18 (a little steep, but there was enough to make two frames)
White spray paint - already had
Fabric rosettes - already had the glue and fabric

Total cost: $9, since I plan to make another one as a gift for a friend.

How do you store your earrings?  Would you use an earring holder like this? 


Saturday, July 23, 2011

Happy Birthday Nash!

Today was my awesome friend Katie's son's first birthday!  Katie is seriously one of the funniest people I know.  However, everytime I hang out with her, I am blown away by not only her quick wit but how she takes everything in stride and focuses on what really matters.  I mean, the birthday boy himself was an hour late to the party and she didn't even flinch!  "A boy's got a nap," she said.  I, for one, would have been freaking out saying "Ohmygawd, people want to see the baby, but he's not here, ohmygawd!"  Thank you Katie, you are an inspiration to control-freak, anal-retentive moms such as myself! :)

But on to more important things - like what the cutie-patootie birthday boy wore!  :)

The theme for the party was mushrooms, butterflies, and forest friends.  It was adorable!  Katie made a cupcake stand by wrapping soup cans with wood grained contact paper and layering them with cut wood rounds.  She made adorable cupcakes with red frosting, and upside-down white chocolate chips so they looked like little mushrooms.  She then placed these adorable thin, edible butterflies on top that she had gotten on Etsy (they looked like these, however I'm not sure which vendor she used).  I was in love with the cuteness.  So with all these mushrooms and foresty things going on, Nash (the baby) needed a matching shirt - enter me.
 I looked at some mushroom graphics on Google Images to get an idea of what shape to make.  I then cut it out of the fabric (bought the red, but already had the brown and the felt).  The next step is ironing on the fusible interfacing, cutting out, and ironing it onto my 18 month old shirt from Target.  I zig-zag stitched around each piece, using red thread for the top and brown for the bottom.  I then eye-balled and cut out the 1.  I straight stitched him onto the middle of the mushroom with white thread.  The 1 looks a little long, but I wanted it to be the length of the mushroom.  In retrospect, I wish I would have made the mushroom squatter and shorter, so the 1 could fill the space and not be so skinny.  Oh well, I still love it.

Here is baby Nash and his beautiful mama.  Sorry about the terrible iPhone pics.  Like I said earlier, Nash was woken from his slumber to attend his party, so he was a little groggy.  But, he's still handsome!


And here are Nate and Audrey playing with Nash in the soda bucket.  They were enamored with the ice cubes.

Happy birthday, Nash!  We are so glad that we could help make your day special!

Sunday, July 17, 2011

Handmade Gift Exchange

I signed up for this summer's Handmade Gift Exchange, hosted by the lovely Linda over at Craftaholics Anonymous. 

I emailed back and forth with my amazing partner Kris and learned a bit about her.  She's a nurse and a mom.  She lives in Tennessee and loves to sew.  She has a couple of the patterns from Sew Liberated, but offered to make me anything I wanted!  I decided on a nice tote bag for bringing things to and from school.  Teachers can never have enough bags!  When it arrived this week, I couldn't believe it - it's so beautiful and so me!
Don't you just love the fabrics Kris used?  I love bright colors and love the patterns she chose for my bag.

Here is a close up of the darling flower pins she added to the bag.  I love that they coordinate, but I could also take them off and pin them on a jacket or scarf as a brooch.  So smart!

She also wrapped the bag up in adorable pink tissue and tied it with lime green tulle.  I wish I would have taken a picture, but I was just so excited to open it that the picture didn't happen.


Here is the gift I made for Kris, all wrapped up and ready to send off.  I made a little ribbon bow and hot glued the wooden martini tile to the center, just as some decoration.  I think it turned out cute.  I tied the gift with twine.

I made Kris two gifts, actually.  I was only planning on making her the oven mitt (see below), but as soon as I saw the bag she made me and the attention to detail she put into it, I had to give her something else as well.  She made the coordinating pins, sewed three pockets inside the bag, chose adorable fabric, and she is such an amazing seamstress.

Here is the oven mitt I made her.  The pattern is from The New Homemade, a sewing book that I love.  It's perfect for novices like me who want to learn about sewing.  It has tons of easy and useful projects - they are perfect for gifts. 

This side is the quilted side.  I now know terms such as "stitch in the ditch" and how to use a "walking foot" for my sewing machine.  I sound so smart and cool.

Here is the other side, with the patterned fabric.  I loved this fabric when I saw it at The Fabric Depot - a HUGE fabric store in SE Portland (it's amazing and overwhelming at the same time!)  I loved the graphic-ness of the polkadots, the cute pink, magenta, and teal colors (kinda retro, right??)  And there are even little forks and spoons on it.  So perfect for a kitchen item.  It was literally begging me to make an oven mitt out of it.

Here is the inside.  It shows the liner is one of the fabrics from the quilted side.  I even made my own binding out of coordinating fabric.  I bought a teal binding tape in case it didn't turn out.  I really need to work on binding things.  It's hard to sew it even and hard to finish it off at the end without it puckering.  Sorry Kris, it's not perfect.

Here is Kris' bonus gift.  I pulled out corks from Oregon wines and made her a cork picture frame.  It was actually my husband's idea to cut some of the wine stained ends off and glue those on.  What a crafty guy!  I think it turned out awesome.
I even made the little sign inside with a free downloaded font.  I wanted the picture to tie in the colors from the oven mitt.

 I hope my partner loves it as much as I loved making it for her!  I will for sure do this again in the future, it was so fun!

Wednesday, March 16, 2011

Keep Calm

Is it just me, or are the Keep Calm and Carry On signs everywhere?  For Valentine's day it was Keep Calm and Love On.  For Thanksgiving: Keep Calm and Gobble On.  And even for St. Patrick's Day I saw Keep Calm and Pinch On. 

Well, I'm not so into pinching, especially with 1st graders, so I decided to make one of my own: Keep Calm and Read On.  I actually saw it in a classroom my team was observing to learn more about Daily 5 and CAFE.  I thought it was adorable and would be easy to re-create.


I put it in a clear sheet protector and, using packing tape, taped it to the side of a bookshelf in my classroom library.  I love it and so do the kids!  I might print another one to display in our large Expedit shelf - It would look great in a white frame!

Make sure to leave a comment with your email address and I will email it to you.  If you'd like it in a different color, just let me know!

What other Keep Calm signs have you seen?

Edit: I just uploaded several new colors to my Scribd account and also pinned them on my Pinterest account.  Thanks!

Sunday, March 13, 2011

Giraffe Diaper Cake

I went to a baby shower last week that had jungle animals on the invitation.  So, I thought a giraffe themed diaper cake would be adorable!  My idea was to find a giraffe print fabric for the burp cloth and matching onesie.  I thought the mom would love how graphic it was and that it wouldn't be too babyish.  She also doesn't know what she's having, so the giraffe print would be gender neutral.  I ended up finding a perfect giraffe print flannel at my fav Fabric Depot (where I've gone for fabric for this project and this project).  Here is the onesie and matching burp cloths I made:
I decided to put a star on the onesie, thinking it would be a good graphic for a boy or a girl.  I also sewed on the new fabric labels I just got for my Etsy shop, Pic-Nik Designs.  I got them here.  Super fast shipping from Australia, great prices, and wonderful customer service.  If you want to get customized fabric labels, I highly recommend them!

Back to the diaper cake.  Since the new mommy and daddy-to-be live in Kentucky and requested gifts to be travel friendly, I only made them a one tier cake.  I used a half pack of Seventh Generation diapers and gave them the other half in a  gift bag (so they would see which brand and size the diapers are).  I wrapped the diapers with some giraffe printed ribbon I found at Joann Fabrics and added some green washcloths, folded to look like flowers (I knew from their registry they were going with a gender neutral green color palate for the nursery).  I also added a yellow stuffed giraffe from Target that has a little wind-up thing on the side to make it play lullabies (kinda like this one) and a little giraffe rattle from Babies R Us. This is kinda like the rattle.  Maybe I couldn't find the original one online because I had bought it in the store a couple months ago?


When I walked up to the baby shower, I saw a giant wooden giraffe on display on the front porch, wearing a bib.  "Score," I thought.  "My gift matches that giraffe."  I then got inside and noticed the mommy-to-be was wearing a giraffe printed dress.  Not only did my gift match the decor, it matched the mommy!  Perfect!  500 points for me!